- Published on
Ever wonder how a Chinese brush painter creates a landscape? Today I am going to show you how I went from a tree to a misty mountain landscape, with all the moments of panic, optimism and despair along the way! Enjoy the journey!
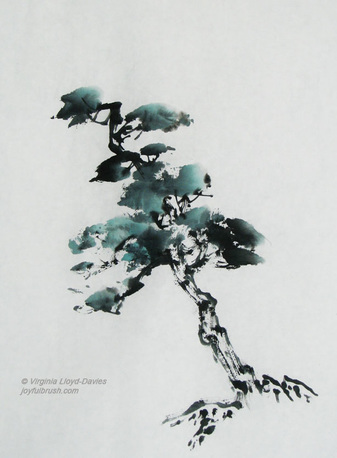
The Tree that Started it All

Mountain Meditation - completed

Chinese brush painting landscapes are backwards - that is, if you're used to Western painting, where you start with the background and work your way forwards. In Oriental art, you start with what's closest and work your way towards the distance in layers. The start of a painting is often either a rock or a tree in the bottom left or right corner. In this case it was a tree. I sketched the trunk in quickly with Chinese ink and added clumps of greenery using mineral green mixed with gray. It looked like it needed a companion, so I added another tree:

Tree Companions
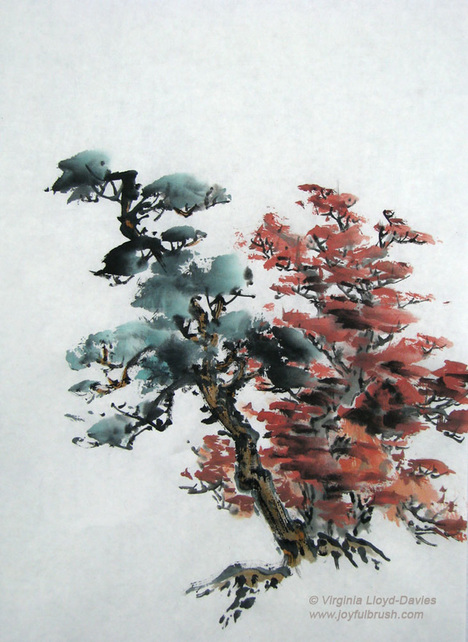
Adding the second tree in a contrasting color created an interesting grouping, and the angle of the two trunks (a V) makes the trees feel anchored. Next I added the rocks that the trees are sitting on.
Foreground Rocks & Rapids

I was making up the composition as I went along, so the next element I added was the foreground rapids. The more 'steps' to the rapids, the more sense of 3-D I can create, so I made the water zig-zag back into the scene. I added trees on the left to give weight to that area, being careful not to make them as tall or as wide as the ones on the right. I've added a waterfall behind the rapids and I'm not entirely happy with this. The rocks on either side are the same height, which breaks the zig-zag pattern that I have created. I'll need to add something to alter the height on one side or the other. Tip: I indicate water by showing the shadows, hinting at rocks under the water. Tip: the rocks are lightly outlined in grey and only certain spots have dark black ink. If I had outlined the rocks all the way in black ink, they would look like cut-outs. I demonstrate rocks and waterfalls here. I demonstrate how to create mist here.

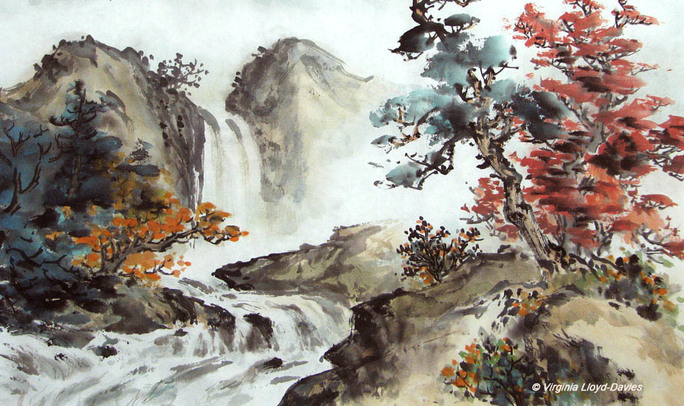
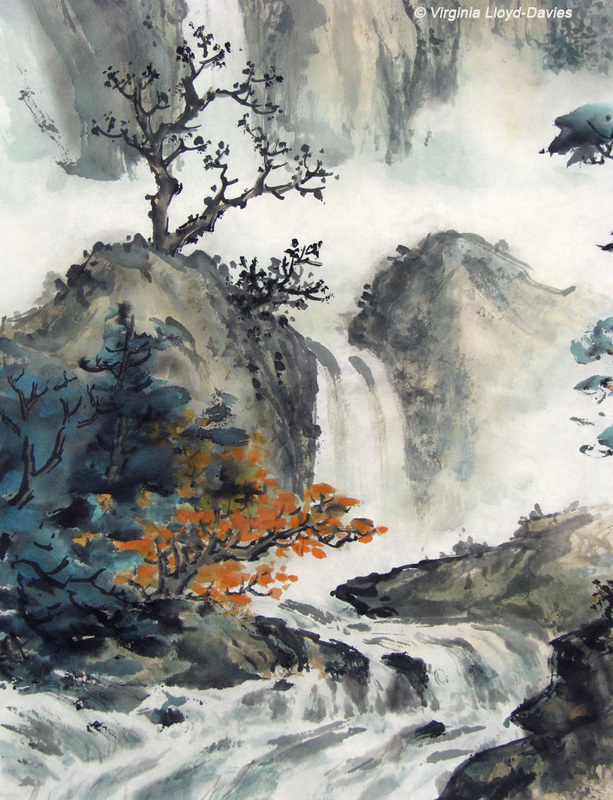
Waterfall in the Distance
The next layer back is a long waterfall, and you can see that I used no black at all for the rocks and cliffs. In fact, I mixed a little mineral blue/green with grey to give a soft color that hints at folds and clefts without shouting. Tip: The lighter the color, the further away it appears. The pine trees on the left, which were added after the cliffs were dry, are in very dark grays. The trees at the top of the waterfall have no definition, just texture. The rocks were tinted with brown after the contours were dry. Watch me demonstrate painting waterfalls here and fixing one here.

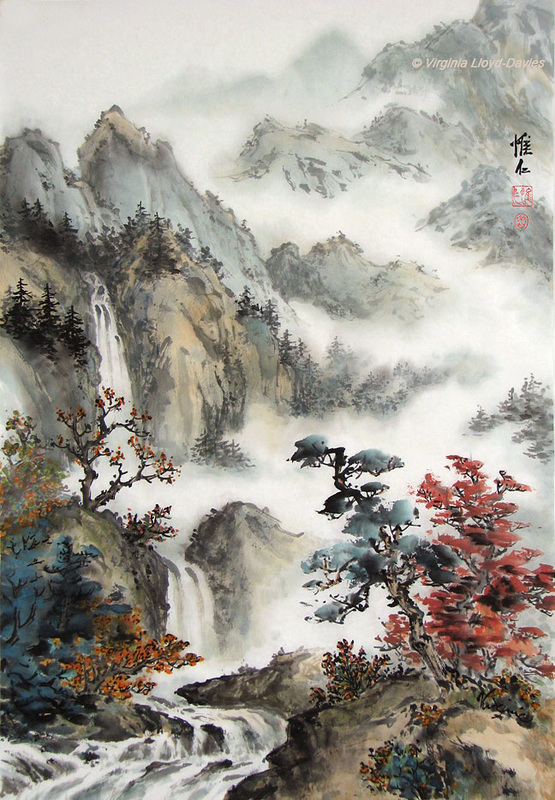
Problems become Apparent
Now you can see the elements as they hung together so far. At this point I was feeling like someone varnishing a wood floor who has painted themselves into the corner. I had added another layer of mountains in blue-gray behind the far waterfall and the whole composition was now lurching to the left. There was much gnashing of teeth going on in my studio. I was ready to tear the whole thing up. I had added mist but it hadn't helped. I also still had those odious bumps in the foreground on either side of the small waterfall that remained stubbornly the same height. I didn't want to make the rock on the left higher because it would then close off the mist area below the distant waterfall and I would then have no break at all on the left. Painting in oils was starting to look very appealing, with the ability to scrape off and cover up at will. I was out of tips.
Why Not Add a Tree?!

My solution to the odious bumps: I added a bare tree to the left-hand bump. I may add color later. For now, it altered the height of the rocks and pushed the distant waterfall further back.

Solving the Middle-Distance Dilemma
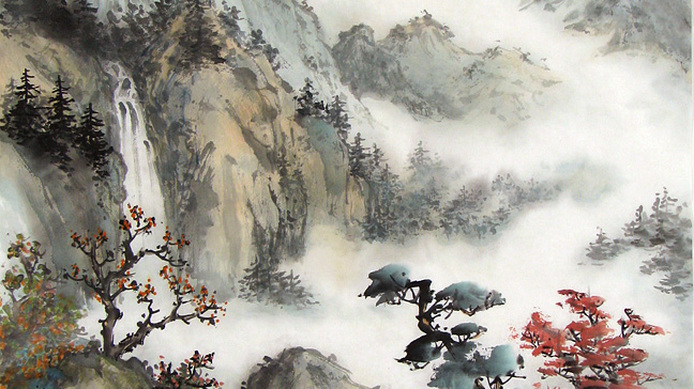
Still trying to drag the composition to the right: here I added a forest in the middle distance, half shrouded in the mist. Tip: I hinted at the tops of pines, but I didn't paint individual trees. I started to add mountains peeking through the mist. Tip: make the mist zig-zag to take the eye upward. I also made the pines on the left cliff of the distant waterfall taller and darker. That pushed the waterfall further back and gave me more tonal options for the mountains in distance.
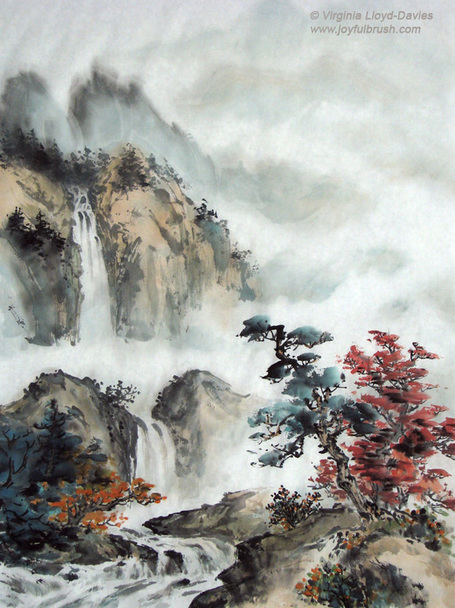
The Finish Line - Mountain Meditation is completed!

And now here's the finished painting at last. In the end I did close up that gap on the left, but by using trees, and leaving some mist visible; I added orange-red dots to the trees on the left-hand odious bump, added mountains climbing off into the distance to the top right corner and adjusted the mist. Phew! I never thought I'd make it! I'm glad I stuck with it, even though I still see some of those original issues. That's the fascination and the challenge of Chinese brush painting - you can modify a composition as you go along, but every mark on the paper is permanent. That makes it easy to over-work.
Materials used: thin raw (unsized) xuan rice paper (18" x 27", 46cm x 68cm), mountain horse brush, happy dot brush, hard bristle brush, flat wash brush, Marie's Chinese watercolors and anything that was hanging about on a dirty saucer and looked interesting and 'earthy'.
Please comment and ask questions. If there is some aspect you would like me to expand on, I'm happy to do it. Every painting has its own challenges, but after a while you start to spot solutions that apply universally.
I just discovered your videos on Youtube and I instantly fell in love with the way you paint! I love your blog as well! Please continue to post new videos. Thank you so much for sharing your experience!