- Published on

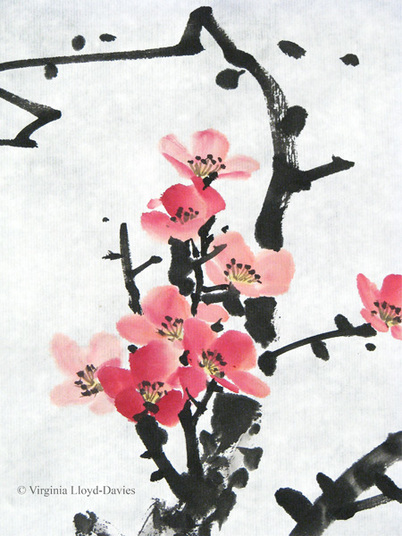
When you paint plum blossom in Chinese brush style, I bet you usually paint the branches first and then add the flowers. But did you know you can do it the other way round? I'm going to show you step by step how I develop a Chinese brush painting of plum, starting with the blossoms.
Tip:
Tip:
- I am using a raw (unsized) single xuan rice paper. Double xuan is fine too.
Tips:
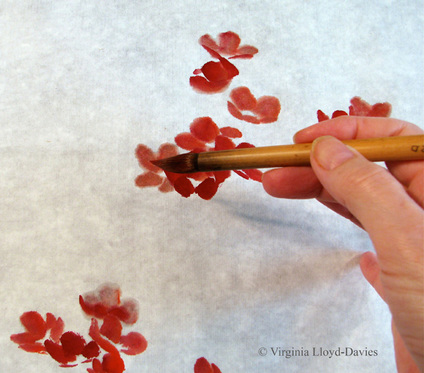
- Start off by selecting one or two colors for your flowers (I like to use a light red for the belly of the brush and Marie's rouge tint for the tip).
- I recommend a small brush for the flowers.
- Practice on a piece of scrap paper to make sure it works the way you want it to. The bigger the brush, the more likely it is to deposit too much moisture on the paper.
Tips:
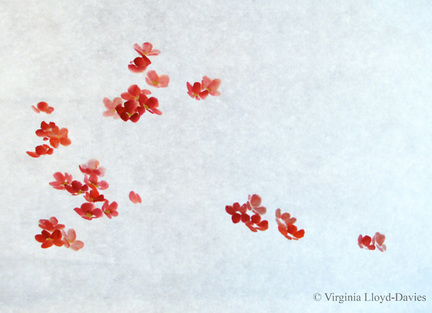
- Build your flowers in small groups, imagining branches linking them. You can never go wrong with the classical triangle for your overall composition!
- Vary the intensity of the color - some flowers light, some dark.
- Don't make your flowers too 'polite': let them overlap to create perspective.
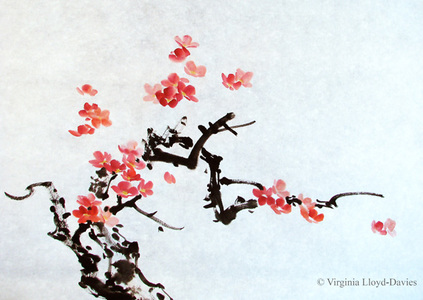
Now add some branches, enhancing the triangle laid out by the flowers. Use black and grey or black and brown. Think about carving the branches into the paper so we feel the power of the old plum tree. This is no time to be timid! Plum is the symbol of winter and represents tenacity in adversity, so be bold!
Tips:
- Use a big, springy, hard bristle brush for the big branches; switch to a thinner brush for the twigs.
- you can always add black ‘mi’ dots to fill in holes or widen a branch.
- If you are not sure of how you want the branch to go, place a thin piece of paper on top of your flowers and try sketching the branches in.
- Make your old branches lighter than your younger ones. Use black with a little rouge tint mixed in for the stems and twigs.
- Avoid snakes! Paint a short section of branch, then pause and change direction.
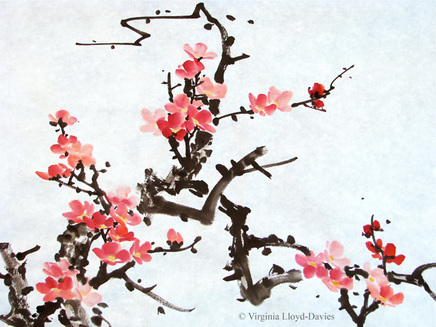
Tip: add yellow or green and yellow to the center of the flowers before they are dry to tie the petals together. Add the stamens when the flowers are dry.
Tips:
- use brown for the stamens and dark brown for the dots. Don’t use pure black or your flowers will look like they’re wearing mascara!
- Try the Happy Dot brush to get fine lines (available from Blue Heron Arts)
- You can also use white for the stamens and add yellow for the dots instead of the dark brown.
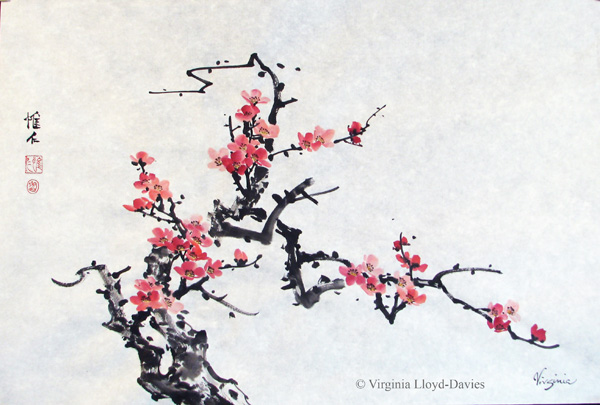
The finished painting, signed and chopped

13 Comments
Hi, Virginia! So enjoying your blog! Am checking out this plum blossom demo first. Just a questions about what is the "classic triangle?" I'm not sure where to see it - in each small group of flowers, or in the bigger cluster, or as a whole painting? Thanks!!
Glad you are enjoying my blog! That's a good question about the triangle. My teacher taught me to think in threes, so there may be triangles within triangles. The flower groups are often in triangles and in this particular composition both the overall flower composition and the final composition with the branches added is triangular. If this is not clear, I'll figure out how I can add a couple of illustrations showing this in the post. Shouldn't be too hard!
Wonderful, really helpful to see the detail on the stamens. I love the idea of doing this backwards. Will be trying out soon. Keep up the great work on the blog.
Let me see how you get on, Liz! I bet you'll find it interesting doing it 'in reverse'.
Wonderful demo and very helpful information...especially the tips. Thank you
Hi Deborah, Glad you found it helpful.
Thanks, Deborah. Glad you found it helpful. Be sure to let me know if you have requests.
Wonderful demo. I've watched all your You Tube videos. Looking forward to your workshop at The Villages in March. So excited. I'm a beginner but I'm motivated!
Hi Jane! Beginners are great! We'll have a good time together at the Villages in March!
Lovely lesson. I have sent you a couple of my paintings for your comments last year. Your comments were so valuable. Can I send you some more? If so how? Regards- sucheta
Looking forward to seeing your latest paintings, Sucheta! Attach them to an email to me.
Thanks for the tips. I've never thought of doing the flowers first and then add branches. Will try and let you know.
It's an interesting switch-round for our heads, doing the flowers first. Let me know how you get on!