- Published on
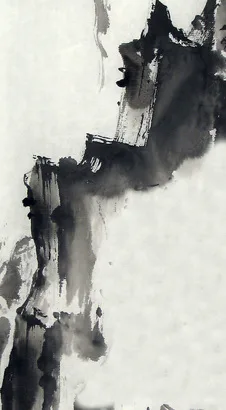
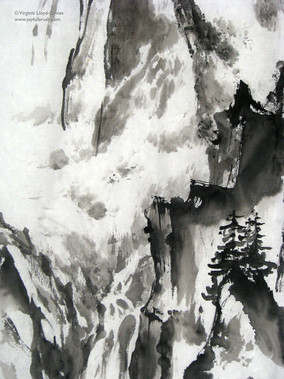
Step One of a Chinese landscape: well, you have to start somewhere. Some artists plan out an entire composition; others - like me - start with a gesture of the brush. In this case it was the double staircase descending from the right. My thought (if indeed one can categorize it as such) was to avoid the pointy rocks that I had fallen into the habit of painting. You can see how it would be easy to despair at this point: what on earth am I going to do with these brush strokes? They may not be pointy, but they are inarguably parallel - a heresy in Chinese brush painting.
The paper is a thin, raw xuan (unsized rice paper) and I am using a mixture of ground Chinese ink and liquid Chinese ink.
The paper is a thin, raw xuan (unsized rice paper) and I am using a mixture of ground Chinese ink and liquid Chinese ink.
The only answer is to soldier on, trying one's best not to be so judgmental that one becomes paralyzed. I seem to have reverted to some of those pointy rocks, but they seem to blend well with the staircase. A jolly little waterfall has made an appearance and if I'd wanted to, I could have trimmed the paper at this point, added some mist and had an okay Chinese landscape. It's so hard to know when to stop. I carried on.
Tip: your landscape needs to grow in a zig-zag fashion. Avoid horizontal steps up the paper. Go for diagonals in your composition.
Tip: your landscape needs to grow in a zig-zag fashion. Avoid horizontal steps up the paper. Go for diagonals in your composition.
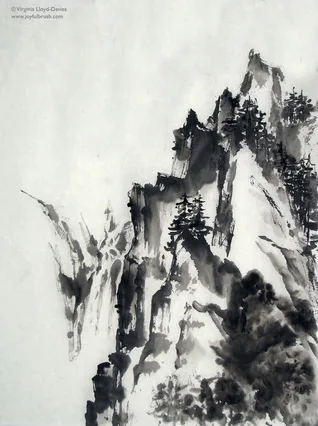
Since I still had at least two-thirds of the paper blank (it was about 20"x27" or 51 cm x 68 cm), I decided to add the next layer of mountain peaks and add a cliff to the other side to the waterfall to create a cleft between the rocks.
Tip: At this point, it's always good to remember not to close off all the gaps, because that's where your mist will go.
Tip: At this point, it's always good to remember not to close off all the gaps, because that's where your mist will go.
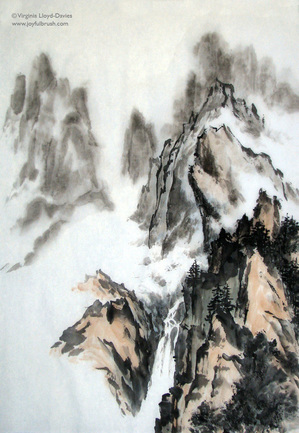
See what I mean about the mist? If I close off the cliff above the waterfall, I lose the illusion of depth. By adding some mist, I show that the higher cliffs are also much further off.
I've also added some shading to the top cliffs, and, what's this? All of a sudden, I see a howling wolf emerging! Do I keep this spirit animal that has so kindly dropped in, or do I change the cliffs to obliterate it?
Tip: Chinese landscapes are organic - they grow with every brush stroke. Don't assume you have a disaster because something unexpected pops out of the brush. It may be the most exciting aspect of your painting!
Here's a close-up of the mist. I am still using the same Chinese bamboo brush (it's mixed hair, with a springy core and a soft outside to hold plenty of moisture). For the misty strokes here, I need a light grey on a fairly dry brush, with just a little darker grey on the tip.
Tip: Stay away from black for mist! You can always darken it, but you can never lighten it, so apply twice rather than regretting a big bad black blob! Try it out on a scrap piece of rice paper before touching to your painting.
Click here for my short downloadable video on how to create mist
Tip: Stay away from black for mist! You can always darken it, but you can never lighten it, so apply twice rather than regretting a big bad black blob! Try it out on a scrap piece of rice paper before touching to your painting.
Click here for my short downloadable video on how to create mist
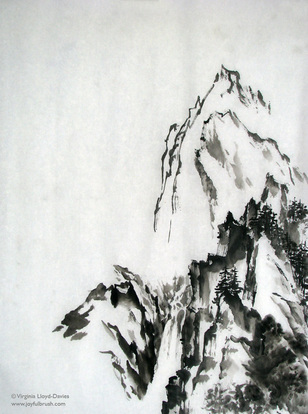
Some Chinese artists complete the ink outlines, then add the mist in grey, then color the rocks and tint the mist. My teacher, I-Hsiung Ju http://www.ihsiungju.addr.com taught me to create the ink sketch, then color the rocks, then add the mist in color. I have now colored the rocks and added some mountains in distance without outline. Boy, was that a surprise! The diluted Chinese ink made some very strange marks on the paper. Slit my wrists or carry on? Prof Ju would always remind us to be brave soldiers and not lose heart!
Tip: You can always save it! All you have to do is release the concept of what it 'ought to be' and allow it to happen gracefully.

Now it's time to start the wash, in order to mould the mist. The wash can be done on the front or the back of the paper, depending on the effect you want. If you do it on the back, it will be softer, but you will need a stronger color to penetrate through to the front.
Tip: Spray the paper so it is uniformly damp. If you see shiny areas, blot them: it means you have too much water.
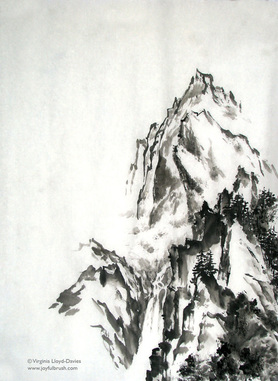
In this painting, I created the mist on the front of the raw xuan paper. I also established the horizon by adding a sunset and adding a rosy-yellow tint to some of the peaks. This will mean strengthening the color on the foreground cliffs when the painting is dry.
Tip: Spray the paper so it is uniformly damp. If you see shiny areas, blot them: it means you have too much water.
In this painting, I created the mist on the front of the raw xuan paper. I also established the horizon by adding a sunset and adding a rosy-yellow tint to some of the peaks. This will mean strengthening the color on the foreground cliffs when the painting is dry.
I darkened the foreground cliffs to contrast with the brightness of the mist, then added stone green and blue to the bottom right. I re-sprayed the painting and added sunset tints to the billowing mist. The wolf continues to grace us with its presence and this Chinese brush painting is signed and chopped.
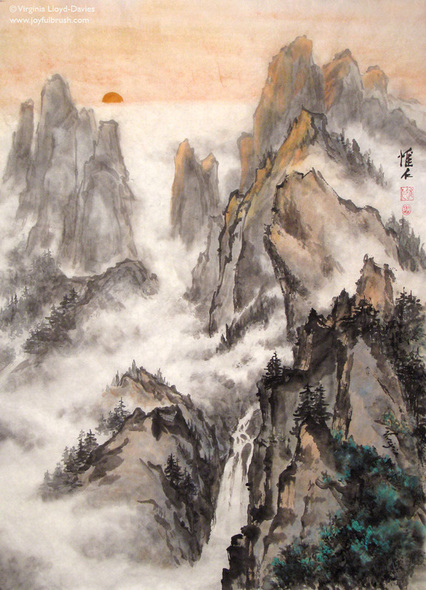
WOLF HOWLS AT SUNDOWN
I hope my demonstration of a landscape was helpful. You can see more of my landscape and waterfall paintings in my gallery. If you have questions or feedback, please put them in a comment. I'm always happy to answer!
Thank you so much for letting me know about your website! Do you have a way I can subscribe and have your blog posts or notification of new posts come in my email?